
Links to Offer
1. Overview of the Section
Flow (stream) is a specific link of an offer with the URL to which traffic is directed. One offer can have several flows with different URLs or settings.
Main features:
- ✅ Creating and editing flows
- ✅ Choosing the type of hosting (External, Internal, Landing, PWA)
- ✅ Configuring URLs with macros
- ✅ Linking to CPA and Offer
- ✅ Managing tags
- ✅ Viewing statistics
- ✅ Filtering by CPA, Offer, type
- ✅ Bulk tag management
2. Creating a Flow
Click the "Create" button in the upper right corner.
[Insert screenshot: Create Flow Button]
2.1 Basic Information
[Insert screenshot: Flow creation dialog with basic fields]
Field | Description | Required |
|---|---|---|
CPA | Select a CPA network | ✅ Yes |
Offer | Select an offer from the chosen CPA | ✅ Yes |
Name | Name of the flow | ✅ Yes |
URL | URL for transition | ✅ Yes |
Active/Inactive | Status of activity | ✅ Yes |
2.2 Types of Hosting (Hosting Type)
[Insert screenshot: Choosing Hosting Type]
Type | Description | URL |
|---|---|---|
External | External URL of the offer | Full URL with protocol |
Internal | Internal landing | Relative path or ID - in development |
Telegram | Telegram channel/group | Deep link through the bot |
External (External URL):
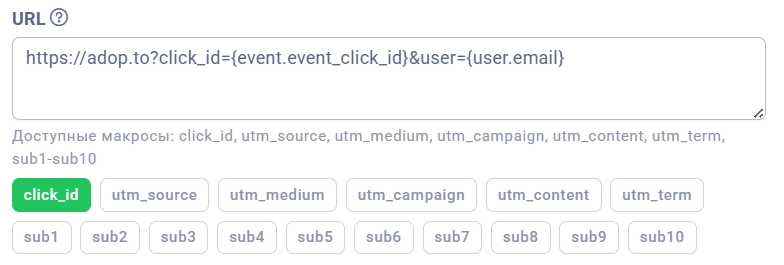
Enter the full URL of the offer from the CPA network, including the protocol, while the input field will already have the URL template you filled in during the CPA network settings.
Example:
https://tracker.cpanetwork.com/click.php?offer_id=12345
Example of available macros:
{event.event_click_id}— tracker click ID{event.ext_utm_campaign}— Utm Campaign{event.ext_sub1}— Sub1 parameter{user.email}— media buyer's email{user.name}— media buyer's name
Macro insertion buttons:
Use the buttons for quick insertion of macros into the URL field
Internal (Internal landing):
In development.
Telegram (Attribution via Telegram bot):
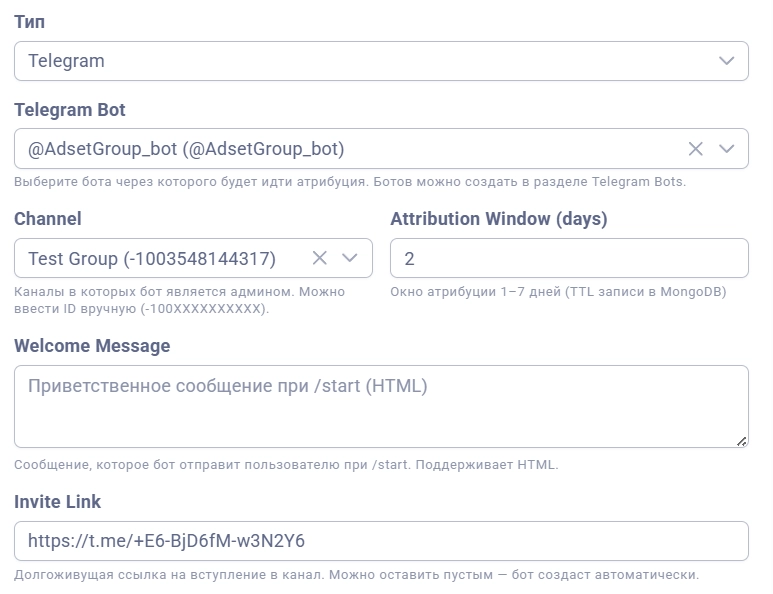
The Telegram type is used for attributing entries to closed Telegram channels and groups. Traffic is directed through a bot that controls the entry process and records the conversion TG_JOIN.
Configuration fields:
Field | Description | Required |
|---|---|---|
Bot | Telegram bot for attribution (from the TG Bots section) | ✅ Yes |
Channel | Channel/group to which the user is directed | ✅ Yes |
Welcome Message | Welcome message upon the /start command | ❌ No |
Attribution Window | Attribution window in days (1–7) | ❌ No (default 2) |
Invite Link | Automatically generated upon first /start | Automatically |
How it works:
- The user clicks the ad link → the tracker generates
clickId - The user is redirected to
t.me/{botUsername}?start={clickId} - The bot receives
/start→ creates an attribution record (clickId ↔ tgUserId) - The bot sends a welcome message with the invite link to the channel
- The user clicks the invite link → a join request is created (
chat_join_request) - The bot automatically approves the request and registers the conversion
TG_JOIN
Example:
Flow: "CryptoChannel Telegram"
Hosting Type: Telegram
Bot: @my_attribution_bot
Channel: Crypto Signals VIP (-100XXXXXXXXXX)
Welcome Message: "Welcome! Click the link below to join the channel:"
Attribution Window: 2 days
Important:
- The bot must be an administrator in the target channel/group
- The invite link is generated with
creates_join_request: true— the user does not join directly but creates a request that the bot approves - This ensures 100% accuracy of attribution — every entry goes through the bot
- The invite link is created once upon the first
/startand cached in the Flow - Attribution records are automatically deleted after the window expires (TTL)
Prerequisites:
- Create a bot in the TG Bots section (menu Tracker → TG Bots)
- Set up a webhook for the bot (Setup Webhook button)
- Add the bot as an administrator in the target channel/group
- Refresh the list of channels in TG Bots (Refresh button)
- Create a Flow with the Telegram type and select the bot + channel
3. Filters and Search
[Insert screenshot: Flows filter panel]
Available filters:
Filter | Description |
|---|---|
Search | Search by flow name |
Status | Active / Inactive |
CPA | Filter by CPA network |
Offer | Filter by offer (depends on the selected CPA) |
Hosting Type | Filter by hosting type |
URL | Search by URL (contains) |
Team | Filter by team (admins only) |
Tags | Filter by tags |
Date Range | Date range for statistics |
Timezone | Timezone |
Cascading filtering:
[Insert screenshot: Cascading filters CPA → Offer]
- Select CPA — the list of Offers will update
- Select Offer — the table will be filtered
When changing CPA, the Offer filter is automatically reset.
4. Working with the Table
[Insert screenshot: Flows table with data]
Table Columns:
Column | Description |
|---|---|
Checkbox | Select row |
CPA | Name of the CPA network |
Offer | Name of the offer |
Name | Name of the flow |
Actions | Actions menu |
Tags | Flow tags |
Type | Type of hosting |
URL | URL or link to the resource |
Active | Status of activity |
Team | Team |
User | Owner |
Statistics | Metrics for the period |
Displaying URL:
[Insert screenshot: URL column with different types]
- External: Full URL (truncated if too long)
- Internal/Landing/PWA: Resource name with icon
5. Actions Menu
[Insert screenshot: Open Actions menu of the flow]
Action | Description |
|---|---|
Edit | Edit the flow |
Manage Tags | Manage tags |
View Statistics | Open flow statistics |
Delete | Deactivate the flow |
6. Viewing Statistics
[Insert screenshot: View Statistics button]
The statistics page will open with pre-set filters:
- Grouping by days
- Filter by Flow
- Selected metrics
- Date range
[Insert screenshot: Flow statistics page]