
Aff. Networks
1. Overview of the Section
CPA (Cost Per Action) is the affiliate network or advertiser you work with. In this section, you manage the list of all CPA networks.
Main features:
- ✅ Creating and editing CPA networks
- ✅ Setting up postback parameters
- ✅ Setting up conversion statuses
- ✅ Managing tags
- ✅ Viewing network statistics
- ✅ Filtering and searching
- ✅ Bulk tag management
2. Creating a CPA Network
Click the "Create" button (green button with a plus icon) in the upper right corner.
2.1 Main Fields
Field | Description | Example |
|---|---|---|
Name | Name of the CPA network | "MaxBounty", "CrakRevenue" |
Currency | Payment currency | USD, EUR, RUB |
Active/Inactive | Status of network activity | On/Off switch |
2.2 Setting Up Conversion Statuses

Set up the names of the statuses used by your CPA network:
Status | Description | Default Value |
|---|---|---|
FTD | Confirmed conversion | "accept", "approved", "ftd" |
Registration | Retention conversion | "hold", "pending", "reg" |
Decline | Declined conversion | "decline", "rejected" |
Trash | Trash conversion | "trash", "invalid" |
Why is this needed?
Different CPA networks use different status names in postbacks. Configuration allows you to standardize them in the system and when receiving a postback from the affiliate network, convert them to the tracker's format.
Example:
CPA Network A:
- Status "approved" → in the system will be "accept"
- Status "pending" → in the system will be "hold"
CPA Network B:
- Status "ftd" → in the system will be "accept"
- Status "reg" → in the system will be "hold"
2.3 Setting Up Postback Macros
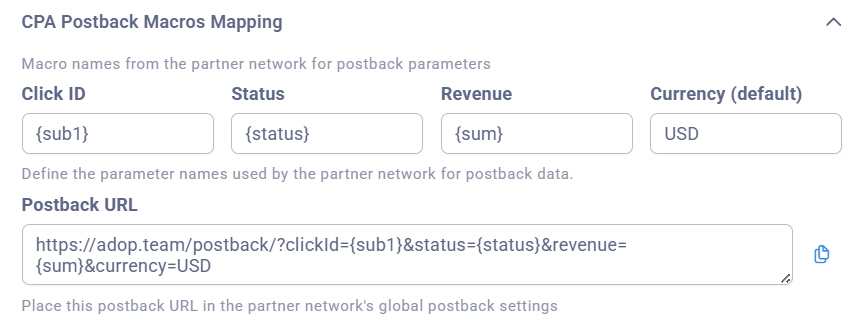
Macros for passing data in the CPA network postback URL. Needed for correct generation of the Postback link. Enter the macros in the fields that will correspond to the accepted parameters.
Macro | Description | Example Value |
|---|---|---|
Click ID | Macro for passing the click identifier |
|
Status | Macro for passing the conversion status |
|
Revenue | Macro for passing the payout |
|
Currency | Payment currency | USD, EUR (list of available currencies) |
How it works:
- The user clicks on your ad
- The tracker generates a unique Click ID and sends it to the CPA network
- The user registers/makes a deposit on the offer
- The CPA network sends a postback to the Adset tracker
- In the postback URL, the CPA replaces the macros with real values
Example postback URL from CPA:
https://yourdomain.com/postback?clickid={click_id}&status={status}&payout={payout}¤cy=USD
In the CPA settings, you specify:
- Click ID =
{click_id} - Status =
{status} - Revenue =
{payout} - Currency = USD
2.4 Param Template
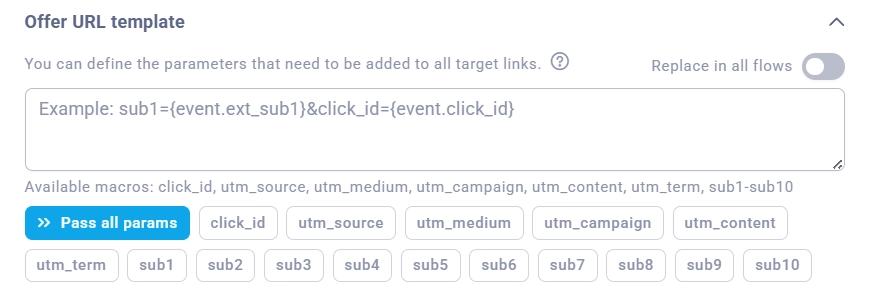
Parameter template for passing in the offer URL. Use tracker macros to pass data to the CPA.
Example of available macros:
{event.event_click_id}— tracker click identifier{event.ext_utm_campaign}— UTM Campaign{event.ext_sub1}— Sub1 parameter{user.email}— email of the media buyer{user.name}— name of the media buyer
Example:
clickid={{click_id}}&aff_sub={{campaign_id}}&aff_sub2={{country}}
This template will be added to the URL of each link of this CPA network.
When editing the CPA network, you can update the URL of all links by enabling the option before saving "Replace in all flows"
2.5 Setting Up Duplicate Conversion Handling
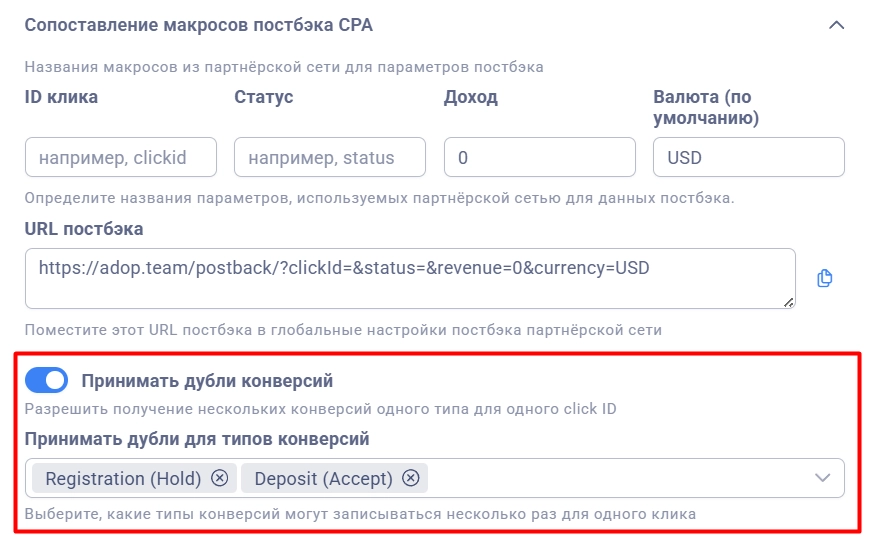
Some CPA networks may send multiple postbacks with the same status for the same click. By default, the system blocks such duplicates, but you can allow their acceptance.
Setting | Description |
|---|---|
Accept duplicate conversions | Enable/disable acceptance of duplicates |
Accept duplicates for conversion types | Conversion types for which duplicates are allowed |
Available conversion types:
- Hold (Registration) — registrations/holds
- Accept (FTD) — deposits/confirmed conversions
When this is useful:
- The CPA network sends multiple postbacks when updating the status
- You work with revshare and receive multiple payouts for one player
- The affiliate sends duplicates for repeat deposits
Example:
Click ID: abc123
First postback: status=hold, revenue=0 → recorded
Second postback: status=hold, revenue=50 →
  - If duplicates are NOT ALLOWED → rejected as a duplicate
  - If duplicates are ALLOWED for Hold → recorded
Important:
If a duplicate is blocked, the conversion is still saved in the system with the status "Error" and marked as "Duplicate conversion". This allows tracking the number of rejected duplicates.
3. Filters and Search
[Insert screenshot: CPA Filter Panel]
Available filters:
Filter | Description |
|---|---|
Search | Search by CPA name |
Status | Active / Inactive |
Team | Filter by team (admins only) |
Tags | Filter by tags (multiple selection) |
Date Range | Date range for statistics |
Timezone | Timezone for displaying statistics |
Note:
Active filters are highlighted with a blue border.
4. Working with the Table
[Insert screenshot: CPA Table with Data and Statistics]
4.1 Table Columns:
Column | Description |
|---|---|
Checkbox | Select row for bulk operations |
Name | Name of the CPA (clickable — opens the list of offers) |
Actions | Actions menu (three dots) |
Active | Status of activity (green/red label) |
Tags | CPA tags (clickable for editing) |
Currency | Currency |
Team | Team |
Owner | Owner (with avatar) |
Statistics | Metrics for the selected period |
4.2 Metrics (Statistics):
[Insert screenshot: Columns with Statistics]
Available metrics:
- Clicks — number of incoming clicks that reached the streamsets
- PWA Views — PWA views
- PWA Installs — PWA installs
- PWA Opens — PWA opens
- Registration — registration conversions
- FTDs — deposit conversions
- Click to Reg (%) — percentage of registrations from clicks
- Click to Dep (%) — percentage of deposits from clicks
- Install to Hold (%) — conversion of PWA installs to Registration
- Install to Accept (%) — conversion of PWA installs to Deposit
- Financial metrics — Revenue, Cost, Profit, ROI, etc.
Column Settings:
Click the table icon in the upper right corner to select displayed columns and metrics.
[Insert screenshot: Column settings dialog]
5. Actions Menu
[Insert screenshot: Open Actions menu]
Click on the three dots next to the CPA to open the menu:
Action | Description |
|---|---|
Edit | Edit CPA |
Manage Tags | Manage tags |
View Statistics | Open detailed statistics in a new tab |
Delete | Deactivate CPA (sets isActive = false) |
Note:
Deleting actually deactivates the CPA, rather than removing it from the database (to preserve history).
6. Tag Management
Detailed guide on tag management
7. Viewing Statistics
Select "View Statistics" in the actions menu to open a detailed report on the CPA in a new tab.
[Insert screenshot: Statistics page with CPA filters]
A statistics page will open with pre-set filters:
- Grouping by days
- Filter by selected CPA
- Selected metrics
- Date range and timezone
8. Freeze Columns
[Insert screenshot: Freeze Columns toggle]
On mobile devices, the "Freeze Columns" option is available to pin the first columns during horizontal scrolling.
On desktop devices, the function is enabled and works constantly.