
Traffic Sources
Traffic Source — is a configuration for integrating an external traffic source (e.g., Facebook Ads, Google Ads, TikTok Ads) with your tracker. The source defines how parameters from the external platform's campaign URL will be mapped to the internal parameters of the tracker.
What are sources for?
-
Parameter mapping: transforming source parameters (fbclid, gclid, utm_*) into a unified tracker format
-
Conversion tracking: sending events back to the source via postback
-
Analytics: collecting statistics for each traffic source
-
Cost management: automatic fixation of click cost
Core Concepts
Source Structure
Each source consists of:
-
Main Settings
-
Source name
-
Owner (user)
-
Team
-
-
Parameters (Props)
-
Fixed parameters (utm_source, utm_campaign, utm_medium, utm_content, utm_term, ext_click_id, cost)
-
Dynamic parameters (sub1-sub10)
-
-
Postback / Pixel (optional)
-
URL for sending conversions
-
Event mapping
-
-
Tags (optional)
- Organization and grouping of sources
How do parameters work?
Each parameter has two fields:
-
GET Param Name (name): mapping the parameter name from the source to the standard tracker name
-
Value (value): source macro for generating tracking URL
Mapping Logic (GET Param Name):
-
If GET Param Name is specified (e.g.,
fbclid):-
The tracker looks for the
fbclidparameter in the URL -
The found value is assigned to the standard parameter (e.g.,
ext_click_id) -
Example: URL
?fbclid=abc123→ the tracker will recordext_click_id = abc123
-
-
If GET Param Name is empty:
-
The tracker looks for the parameter with the original name (e.g.,
ext_click_id) -
Example: URL
?ext_click_id=xyz789→ the tracker will recordext_click_id = xyz789
-
URL Generation Logic (Value):
-
The Value field is used to create the tracking URL, which is inserted into the traffic source
-
In Value, source macros are specified (e.g.,
{campaign.id},{ad.id},__CAMPAIGN_ID__) -
The system collects all parameters and their values from the mapping and forms the query string
-
This URL is copied and pasted into the source's ad cabinet
Example of Operation:
Parameter | GET Param Name | Value | What Happens |
|---|---|---|---|
ext_click_id |
|
| Mapping: the tracker looks for |
utm_campaign |
|
| Mapping: the tracker looks for |
sub1 | (empty) |
| Mapping: the tracker looks for the |
Managing Sources
Viewing the List of Sources
The Sources page shows all your traffic sources.
Table Columns:
Column | Description |
|---|---|
Name | Source name and utm_source value |
Actions | Action menu (edit, statistics, delete) |
Tags | Assigned tags |
Team | The team to which the source belongs |
Owner | Source owner (user) |
Metrics | Clicks, PWA Installs, Conversions, Revenue, Cost, etc. |
Creating a New Source
Step 1: Open the Create Dialog
-
Click the "+ Source" button in the top right corner
-
The "New Source" dialog window will open
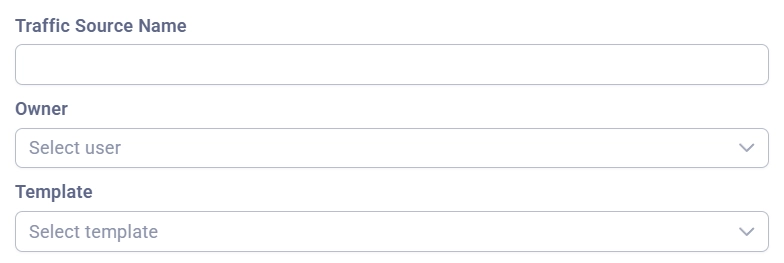
Step 2: Main Settings
Fill in the required fields:
- Traffic Source Name: a unique name (e.g., "Facebook Ads - Casino", "Google UAC - Dating")
For Team Lead and Tech:
- Owner: select the owner from the users of your team
For Buyer: the owner is set automatically (you yourself)
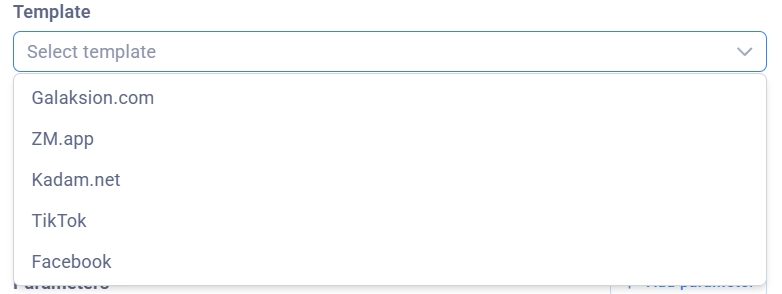
Step 3: Selecting a Template (Optional)
-
In the Template field, select the desired template
-
The system will automatically fill in the parameters and postback URL
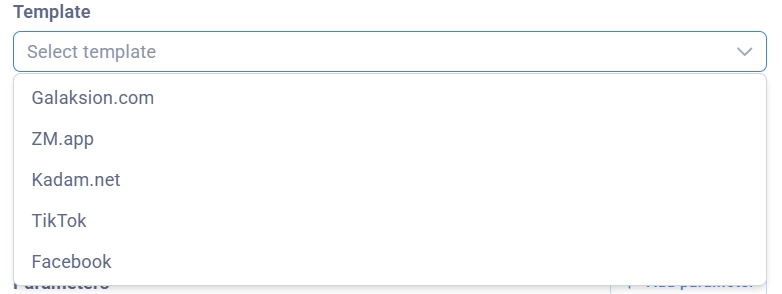
Popular templates:
-
Facebook Ads (with fbclid)
-
Google Ads (with gclid)
-
TikTok Ads (with ttclid)
Configuring Source Parameters
Fixed Parameters
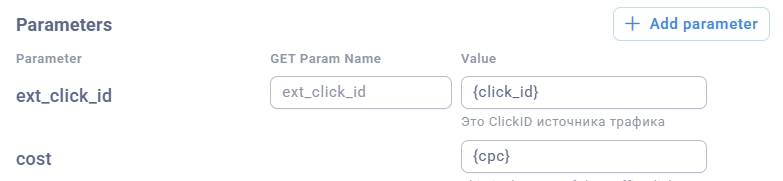
These parameters are always present and cannot be deleted:
1. ext_click_id — Source Click ID
Purpose: a unique click identifier from the traffic source. Used for feedback with the traffic source.
Configuration examples:
Source | GET Param Name | Value | How It Works |
|---|---|---|---|
| Mapping: | ||
Custom |
|
| Mapping: the tracker looks for |
Without mapping | (empty) |
| Mapping: the tracker looks for the |

2. cost — Click Cost
Purpose: automatic fixation of click cost
Configuration examples:
Scenario | GET Param Name | Value | How It Works |
|---|---|---|---|
Fixed price | (empty) |
| URL: |
Dynamic from the source |
|
| Mapping: the tracker looks for |
Without cost | (empty) |
| URL: |
Important: the cost parameter usually does not require mapping (GET Param Name is empty), since the value is generated by a macro or is fixed.
3. utm_source and other utm tags
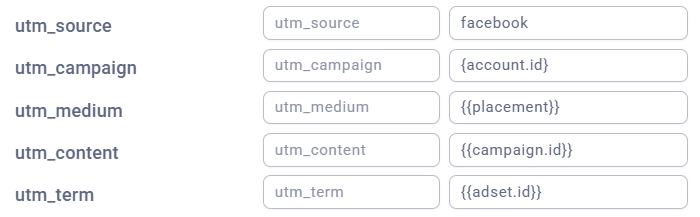
Purpose: identification of the source in statistics
Examples:
GET Param Name | Value | How It Works |
|---|---|---|
(empty) |
| Mapping: the tracker looks for |
|
| Mapping: the tracker looks for the |
|
| Mapping: the tracker looks for |
Dynamic Parameters (sub1-sub10)
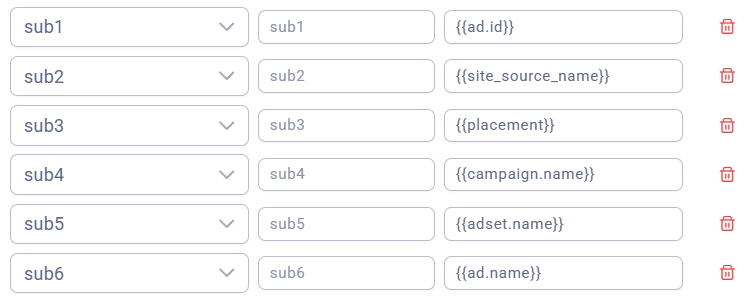
These are additional parameters for passing arbitrary data.
Usage examples:
Parameter | GET Param Name | Value | How It Works |
|---|---|---|---|
sub1 |
|
| Mapping: the tracker looks for |
sub2 |
|
| Mapping: the tracker looks for |
sub3 |
|
| Mapping: the tracker looks for |
sub4 | (empty) |
| Mapping: the tracker looks for |
sub5 | (empty) |
| Mapping: the tracker looks for |
Adding/Removing Parameters
Add a parameter:
-
Click the "+ Add parameter" button
-
Select the desired parameter from the dropdown list (sub1-sub10)
-
Fill in the GET Param Name and Value fields
-
The parameter will be added to the list

Remove a parameter:
-
Click the trash icon to the right of the parameter
-
The parameter will be removed
-
Fixed parameters cannot be deleted

Source Templates
What Are Templates?
Source Template — is a preset configuration of parameters and postback for popular traffic sources. Templates allow you to quickly create new sources without manual configuration.
How to Use a Template?
When creating a new source:
-
In the Template field, select the desired template
-
The system will automatically fill in:
-
Parameters (GET Param Name and Value)
-
Postback URL (if configured in the template)
-
Pixel events
-
-
You can edit any fields after applying the template
Postback and Pixels
What is a Postback?
Postback — is an HTTP request that is sent to the traffic source when an event occurs (registration, deposit, PWA installation).
Configuring Postback
When creating a source:
-
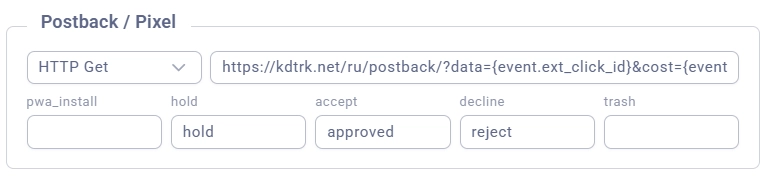
In the Postback / Pixel section, fill in:
-
Type: HTTP Get (the only available type)
-
URL: the postback address of the source
-
-
Configure the events:
-
pwa_install: PWA installation event (e.g.,
Lead) -
hold: conversion in Hold status (e.g.,
CompleteRegistration) -
accept: confirmed conversion (e.g.,
Purchase) -
decline: declined conversion (leave empty if not needed)
-
trash: trash conversion (leave empty if not needed)
-
When editing a source:
If the source already has a linked pixel:
-
The Postback / Pixel section is displayed with the current settings
-
You can change the URL and events
-
Changes are saved to the existing pixel
If there is no pixel:
-
You can create a new pixel directly from the edit form
-
Fill in the URL and events
-
Upon saving, a new pixel will be created and linked to the source
Postback URL Examples
Custom Postback
https://postback.example.com/track?click_id={event.event_click_id}&event={postback.status}&payout={revenue}
Available macros:
-
{event.ext_click_id}— traffic source click ID -
{postback.status}— event type from the event mapping -
{revenue}— revenue amount -
{currency}— currency
Pixel Events
Event | Description | When It Is Sent |
|---|---|---|
| PWA installation | The user installed the PWA |
| Registration/Hold | Conversion in Hold status (pending) |
| Confirmed conversion/FTD | The CPA confirmed the conversion |
| Declined conversion | The CPA declined the conversion |
| Trash conversion | The CPA marked it as trash |
Source Statistics
Viewing Statistics in the Table
The sources table shows metrics in real time:
Main metrics:
-
Clicks — number of clicks
-
PWA Views — PWA views
-
PWA Installs — PWA installations
-
PWA Opens — opens of installed PWAs
-
CPA Hold — conversions in Hold
-
CPA Accept — confirmed conversions
-
Revenue — revenue
-
Cost — costs
-
Profit — profit
-
ROI — profitability
Configuring Displayed Metrics
-
Click the button with the table icon (📊) in the toolbar
-
The column selection dialog will open
-
In the Metrics section, select the desired metrics
-
Metrics are grouped by category:
-
Events — events (clicks, installs, opens)
-
Conversions — conversions (hold, accept, decline)
-
Finance — finance (revenue, cost, profit, ROI)
-
Rates — rates (CR, CTR, conversion rates)
-
Filtering by Period
-
In the toolbar, select a date range in the calendar
-
Select a time zone from the dropdown list
-
The statistics will update automatically
Detailed Source Statistics
Open detailed statistics:
-
Click the actions menu (three dots) next to the source
-
Select "View Statistics"
-
The statistics page will open with grouping by day
On the statistics page you will see:
-
A table with a breakdown by day
-
The ability to group by various parameters
-
Data export